The Fridge Edit
Clea and Joanna of Netflix’s new show, Get Organized with The Home Edit, are inspiring people with their colorful shelves and easy approach to organization.
In The Home Edit, every item has its place. Much like Marie Kondo’s simple style, people who sign up for a Home Edit follow three main steps: 1. Edit, 2. Clean, and 3. Organize.
Last year, we showed you how to “Marie Kondo” your refrigerator . But let’s be honest, a lot has happened this year! The holidays are coming up, and it is time to make room for any small gatherings you may be having with family. Set aside a few hours and get ready—we are going to take you step-by-step through what we are calling a “Fridge Edit”:
Step 1: Edit
Clear a space in your kitchen for food and have a trash bag nearby. Take everything out of the fridge and work quickly to make sure nothing in the fridge goes bad by sitting on the counter (if you have a large cooler, you can also put items in there for up to 2 hours [1] ).
For each item in your fridge, ask yourself the following questions:
-
How long have I had this food?
- Most leftovers stay good for 3-5 days
- Opened sauces, jams/jellies, and other condiments keep anywhere from 4-12 months in the fridge. To decide whether to toss or keep an item, look for mold growth and changes in color or texture. Unusual smells can also indicate that a food has gone bad. Note: you should not taste an item to figure out if it has gone bad… You will not find out until later when you get sick!
- Fresh produce like fruits and veggies may last longer or go bad faster depending on the item.
- Check out the FoodKeeper website or download the app to search for specific items in your fridge!
-
Is there a “best by” or “use by” date?
- Toss food that has passed its “use by” date
- A “best by” date is an estimate for the best quality of the food. If a food is unopened and shows no signs of spoilage, it can stay… But if you can’t remember when it was opened or looks/smells questionable, toss it! [2]
- Be aware that food can make you sick even if it does not appear questionable. This is because the bacteria that causes foodborne illness can still grow on refrigerated foods even if they don’t look like they have “gone bad.” Cooking raw meat, poultry, and seafood within a few days after purchasing will help lower your risk. [3]
- Check out our blog on Minimizing Food Waste for more information on these labels and how to maximize your purchased foods to make your next “fridge edit” easier!
Rule of thumb: When in doubt—throw it out.
Step 2: Clean
Remove all the drawers and shelves if possible. Use warm, soapy water and a rag to clean all the shelves and drawers in the fridge. Use a new, dry cloth to dry the shelves and drawers completely before putting them back in the fridge.
If they fit in your budget, clear storage bins are a game-changer if your family is prone to spills and sticky messes. Bins make clean-up a breeze since the whole fridge shelf does not have to be taken out!
Good food safety includes cleaning up spills as soon as you see them, not just during a full “fridge edit”. This will help prevent the spread of harmful bacteria that cannot be seen or smelled!
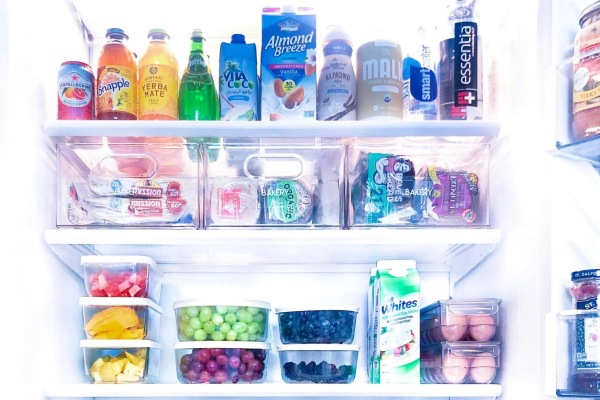
Step 3: Organize
It is easy to forget what is in your fridge when you can’t see it! The Home Edit suggests separating foods into categories, such as Dairy, Meat/Poultry, Fruits, Veggies, Snacks, Beverages, Leftovers… It is all about creating a flow that works for your family.
This is the perfect time to break out the clear storage bins and labels, or just divide the fridge into zones in your head.
- For example, it is good practice to put raw meat on the bottom shelf of the fridge (or wrapped securely / in a separate container) to prevent meat juice from dripping on other foods, making them unsafe. This includes marinating meat, which should always be done in a sealed container in the fridge! [3]
- Speaking of sealed containers, get into the habit of using closed containers to store food, especially leftovers and opened items. This will prevent moisture loss and the absorption of odors. [4]
- The door shelves are usually not as cold as the rest of the fridge, so very perishable items like dairy, eggs, and raw meat should not be stored on these shelves, but drinks and condiments will be fine.
- Store smaller items on the top shelf so you can see through to the lower shelves. Try not to stack items that will block the view of other foods behind them.
Find more fridge food storage tips from Registered Dietitians and the FDA .
Whew! You did it! Your fridge has been “edited” and is ready to take on more delicious meals like the ones on the FoodTalk website .
Love this blog? Check out more from FoodTalk:
- How to Stock and Use Your Pantry
- What’s in Your Fridge? Making Food Last
- Tips for Temperature Control and Preventing Spoilage
Written by Melanie Ng, Ph.D. Student | Edited by Leslie Davis, RDN, LD, CDCES and the Nutrition Education Team
[1] FDA – 2 Hour Rule for Food Safety